MyCar: class project corso di Computer Grafica AA 2021/22

Renderer_00

  1. use Renderer.car.frame to replace the white triangle with the car you modeled in code1_transformations
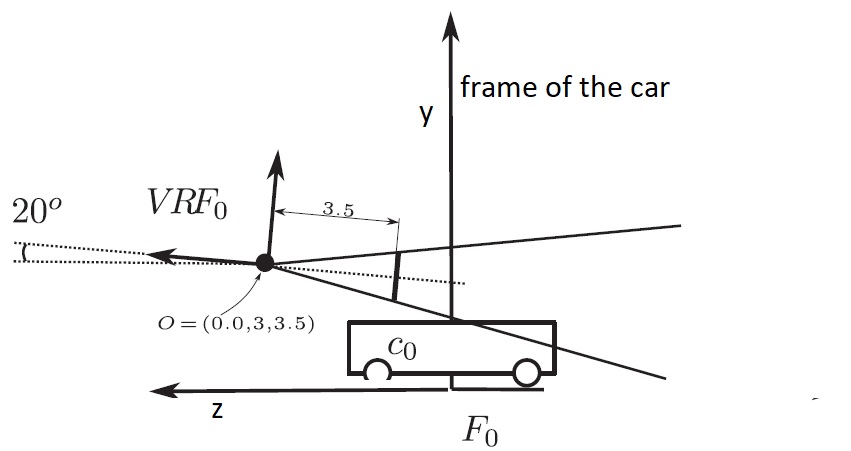
  2. implement the chase camera> The chase camera is camera that follows the car from behind and slightly above, as shown in the figure. You need to define this camera in the object frame of the car and then transform it into world space. Then you only need to setup the view matrix with the resulting camera. The numbers shown in the illustration below are justs example, place you chase camera where you like

Renderer_01 -- (redirects to Renderer_03)

Renderer_02 -- (redirects to Renderer_03)

  1. Add textures to the scene elements: the ground, the track and the buildings.

    track and ground

    The elements Game.scene.trackObj and Game.scene.groundObj already have texture coordinates in the buffer texCoords The u texture coordinate for the vertices of the track is set as the length of the track up to that point. The v is 0 for the vertices on one side of the track and 1 for the vertices in the other side.)


    The only thing to do is load the image, create the new vertex atribute for the texture coordinates, create the texture and access it from the program shader. It is all contained in the code code-6-class-Texture-mapping-bump-normal-parallax-mapping

    buildings

    Each building is now split in facades and roof:
    Game.scene.buildingsObjTex[i] : facades of the i-th building
    Game.scene.buildingsObjTex[i].roof : roof of the i-th building

    All buildings have 4 facades and their texture coordinates are found by unrolling them in texture space. (see figure above)
    The roof are just made of a quadrilateral.
    A sample of images for the ground, the track, the facades and the roofs can be found in common/textures or you can find textures of your liking on the internet, for example
    https://archivetextures.net
    http://texturer.com/
    or just google for it, or make your own..
  2. Use Projective Texture Mapping (slide 26 of "Lez_14-15 Texture mapping II 07_04-2022_11_04_2022.pdf") to add car's headlights.
    Steps for the front right headlight:
    1. place a view frame just like for the chase camera in the "Renderer 00" but this time in the front-right part of the car.
    2. pass the corresponding view matrix to the vertex shader
    3. In the vertex shader, transform the coordinates using this view matrix and store the result in a texture coordinates varying variable.
    4. In the fragment shader, access the headlight texture with the input texture coordinates.
    You can use the texture in common/textures/headlights.png.

    note : the image is a RGBA image, where the A component is the transparency. At the center is is 255 (fully opaque) and then it decreases to 0 at the circle border.
    Use the A channel to blend the texture color of the headlight in the final result.

Renderer_03

  1. The headlight of the car added in Renderer_02 do not just project on the first surface in front of the car but in the whole frustum of the headlight. Use Shadow Mapping to fix this behaviour. A basic shadow mapping with a small bias will be sufficient.
  2. Add a camera like the chasing camera of Renderer_00 that can be controlled by the user. The user control consists of changing the position of the point of view with the keyboard and the view direction with the mouse.